Showing posts with label DIY. Show all posts

Monday, December 27, 2021

The Best Homemade Gift I EVER Got

My daughter was asking about gifts for weeks up till Christmas. After telling her I wanted World Peace I mentioned  that her homemade gifts are my favorite. 

I love this card she created.


She always told me she doesn’t work well with watercolor but this tells me differently. 

What was your favorite gift this year?


Saturday, February 21, 2015

How To Turn An Amazon Fire TV Box Into A Monster High Doll Bed #tutorial #monsterhigh @amazon


My niece got us an Amazon Fire TV for Christmas this year. It is pretty damn cool and we love it. But this post is not about that. I noticed the box was pretty cool with it's overhead compartment which had housed the power cord. In the past I have saved boxes thinking I would do something with them but end up tossing them a few weeks later during a clean up purge.  Not this time!


Last month I grabbed the box while waiting for my daughter to finish reading her homework to me and stated playing with it. I must have tried about 15 different configurations before settling on the one that would eventually become a bed for Monster Toralei.


The box!

At first I thought the legs would be made of crayon then worried about marks on the furniture

So I rolled up some magazine strips with a pencil and wrapped it with the tape
The legs

Ta Da...legs!

Next I measured some foam sheets to go with the bed colors

And hot glued it down. I also hot glued at this point the sides of the bed and added a coordinated bed for the cabinet


A Monster High banner as decoration

And Toralei now has a bed


Monday, August 19, 2013

Home Made Rug Cleaner Worked For Us!

I am sure you have seen it. Everyone on Pinterest is talking about a rug cleaner that uses

Baking Soda
Peroxide 
and dish soap. 


This terrible stain is in Goddess' bedroom. One day about 3 years ago she got a stomach virus after consuming her favorite chocolate hence this terrible stain! We hate it and used at least 10 different cleaners over the years and finally put a rug over it. I shook up the peroxide, baking soda and dish soap in a spray bottle for a loooong time. The Baking Soda takes a long time to dissolve but when we did...and scrubbed the stain with a toothbrush...we were surprised.

I cannot believe how long we had to look at that ugly stain! It looks amazing now.


Friday, August 02, 2013

Our Hannah Montana Beach House To Monster House Redo

I have been dying to talk about this for months. True story.. I purchased a Hannah Montana Beach House for $40 and turned it into my daughter's favorite doll house ever!

All it took was $10.00 of Spray paint and some time!


Here is the only photo I have of it before Goddess saw it at her Birthday Party.


She inspects our handy work


Here is Handsome helping her with the bag of doll furniture.

Tuesday, July 30, 2013

#Monster High Pendant Tutorial

OK, I don't know shit about creating a tutorial. I suck at taking photos and usually remember after I start something that Bloggers are only as good as their photos and words. My husband always says, "bloggers are never without their cameras" yet, I jump in like I do everything else in my life and fail to capture all the important things.

SO...with that said, here is my Monster High Pendant Tutorial...

We received a box of crafts, toys, jewelry and miscellaneous items during a friends move.  She usually calls me over and sends me home with boxes and bags of things like clothes, household goods, books and stuff that she and the kids no longer want.  In one of the boxes I found a bag of Rummikub pieces. Never heard of it and had no idea what I was going to do with it but held onto it.


Light bulb moment! I gathered my supplies not knowing if it was going to work but...eureka I did!

Rummikub Pieces
Newspaper
Tacky Glue
X-Acto Knife
Paint Brush
Glitter
Stickers, pictures, whatever
Foam Sheets
High Gloss Clear Spray Paint


Cut the foam to fit the base like the one above or the one below.


Glue foam to both sides of the Rummikub.


Put glue all around the Rummikub sandwich and dip into glitter

We made lots of them....couldn't stop...addictive...send help!

Next we added some stickers


Glued a bail to the back, added the high gloss clear spray paint and........


Wah La

These were our first twooooo and Goddess loves them. We made some for her friends at school and plan on making many more. We even did some magnets for Halloween. Fun and easy and we had everything in our supplies. Isn't that the best kind of craft?

See my Monster High Suitcase Redo

Friday, July 05, 2013

From Boring Kid Suitcase To Monster High Fashion Bag

A few years ago Goddess got this bag as part of a hand-me-down thing from her God-Sister Jordan. We have received many of Jordan's outgrown things over the years and this one was kept in the closet with Goddess' Zhu Zhu Pet collection until she narrowed her collection down after her Monster High obsession took over. She is seriously obsessed and longs to own everything Monster High. Her bedroom has become Monster High/Halloween (she has had a Halloween thing since the age of 3 so it is no wonder she loves these dolls). Everything that isn't "Monster Highish" has been cast out through our local tag sale site or handed down to friends.

She asked me about 4 months ago if she could get rid of this bag. I took it and put it aside in my closet because I thought it was cool and didn't want to toss it. At the time I didn't know what I would do with it but one day in May I had a light bulb moment.

When I get into a creative zone, I just run with it so usually forget to take a photo of the before product. I remembered to take this photo after I taped it. You can see the blue tape around the edges and the bottom of the handle.  It took 10 minutes and I didn't want to untape it just for the purpose of a photo.


Next I took to the deck with a can of spray paint. After our Monster High House redo which I will post about (it is AWESOME), I think spray paint is the fix for everything.

Next I put a coat of primer on it. Primer is necessary on all my paint jobs. Primer is important because it makes for a smoother finish for the layer of paint that matters.  Primer creates a smooth and consistent layer for the paint to be spread over and to bind onto. If the item isn't primed you can get a messy finish which looks awful. Krylon All Purpose Primer is my absolute favorite and I have at least two cans at all times these days. I feel like you can use any spray paint but the primer matters!


Next I put two layers of black spray paint.


Before it dried I added some glitter to the very top on both sides.


A shot of Acrylic clear top coat finished my paint job.

After it was dry, I added a wall cling decoration that we had on her bookshelf.


AND some sparkly purple puff paint to the edges.


Obviously, she now loves her very special bag which I can see I still need to remove some tape from now on this close up.

Isn't this the type of bag that a girl who sleeps in a Monster High Eye Mask deserves?


Tuesday, April 09, 2013

Goddess 8th Birthday Labor of Love

Over the past few weeks I have been in the process of creating a Monster High Doll House for my Goddess as an 8th birthday gift even recruiting Teach to assist on the bigger part of the job. We purchased a used Hannah Montana Beach House and have been working whenever we can on transforming it into a one of a kind Monster High Doll House that Goddess hopefully we love.

Here is the first piece I did. This was a green, plastic dresser piece that belonged to Goddess' God sister J when she was a little girl. We think it was from one of the Barbie houses back in the day, she is 15 now.

All I did was spray paint it with primer, give it a coat of black and while it was drying, dust it with some glitter. We added a gem as embellishment and Goddess loved it, claiming it for Frankie Stein!


Tuesday, February 08, 2011

Ruby Tuesday - Valentine Craft Idea


After more than 5 snow days this year, the kids were home yet again due to the weather. While I love having them home, cabin fever was setting in for everyone and if I could keep them apart for a little while, there would be some peace and I could give my voice rest from having to repeat "leave him/her alone, stop fighting over it, take turns, stay away from each other, get out of his/her room, will you guys please knock it off!" I mean really, why do siblings fight so much? If they are not loving and hugging each other, they are complaining, or tattling, or upsetting one another.

Goddess loves crafts! Handsome likes crafts and since he was busy I didn't call him for the first round.

Supplies:
  • Wax Paper
  • Mod Podge  (everyone needs this in their house, you can use it in 1,000,000 ways).
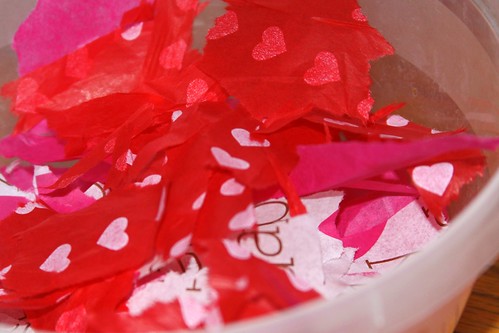
  • Left over Tissue Paper (we used some white and red from Christmas and I grabbed a pack of Valentine paper from CVS and I had some left over from last year).
  • Glitter (optional)
Tear up the tissue paper.

Tissue Paper

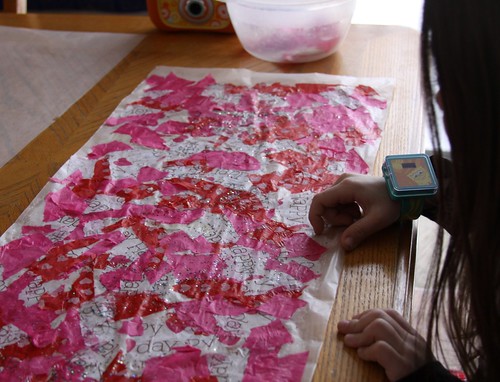
Put down the wax paper (it was long enough the small end of my rectangle table)and lay a generous layer of Mod Podge over it. We did half of the paper at a time to figure in drying time.

Then just have the kids put down the tissue paper. The glue will soak into the paper. Just over lap paper to create a mosaic, filling in all the empty spot on the wax paper.

Valentine Craft

Then I sprinkled glitter over it and walked it to the deck to shake off the excess. There wasn't much excess, that Mod Podge is some amazing stuff. Love It!

Next let it thoroughly dry (the hardest part for the kids). It only took about 15 minutes.

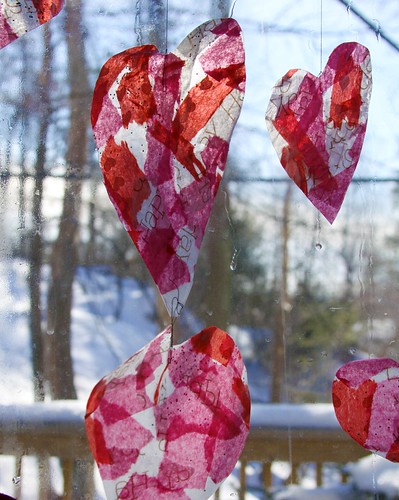
Then cut out shapes of hearts in all sizes. I just eyeballed it as Rachel Ray would say but I am sure you could use templates to get the perfect heart shape. Mine looked pretty damn good I must admit.

Poke a hole in the heart toward the top for hanging. You can use a hole puncher or I have a screwdriver type type that has a point on it. I use it for jewelry making and while I am sure it has a technical term, we will just call it the pokey thing.

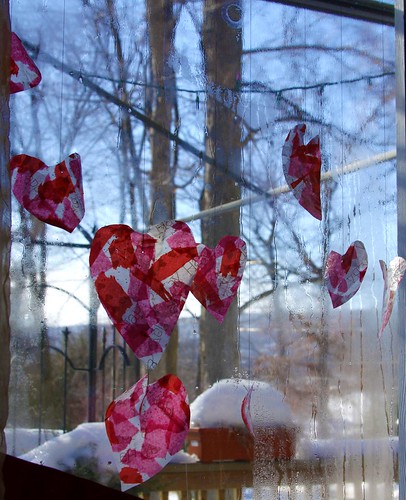
Next I took thread (sewing thread, I am sure any color would work fine but I used black as it is all I have. We don't do much sewing here). and put it through the hole and back again to create a knot so I could hang the heart. I staggered the sizes of the thread to that the hearts look like this....

heart craft

IMG_6772

Wah La...there you have it. Cute Valentine stained glass ornaments that are easy and fun to make. Even Handsome, enjoyed himself.